WordPress Contact Form Entries to Google Sheet

WordPress Contact Form Entries to Google Sheet

Whether you have a simple blog or a business website, the “contact us” page is compulsory. And, there are dozens of Contact Form plugins available, when it comes to WordPress.

In this post, I will be explaining how you can store the Contact Form entries in a Google Sheet using a plugin like CF7, WPForms, Gravity Forms, Ninja Forms.

If you are using Elegant themes (Divi) or Avada theme and created your forms through DIVI Contact Form Module or AVADA Forms or Elementor Forms then also solution to send Entries to Google Sheet is available

DIVI Forms Google Sheet Connector
AVADA Forms Google Sheet Connector
Elementor Forms Google Sheet Connector

Also, If you are having an eCommerce store and using WooCommerce or Easy Digital Downloads then you can use the following

WooCommerce Google Sheet Connector
You can Download the Free version

Easy Digital Downloads Google Sheet Connector
You can Download the Free version

Contact Forms using Google Sheet Connector Features

Free Version PRO version
One-Click Authentication (Secure) One-Click Authentication (Secure) + Custom API Integration
Creating Sheet Manually from Google Sheets (sheets.google.com) Creating Sheet Automatically from Plugin Settings
Enter Sheet Details Manually (SheetName, SheetID, TabName, TabID) Selecting the Sheet Directly from Dropdown for easy configuration
Manual Adding Headers in Sheet Column Automate Headers based on selection
Manual Special mail tags, smart tags, merge tags Automate Special Mail tags, smart tags, and merge tags as per the selection
WordPress.org Support

(https://profiles.wordpress.org/westerndeal/#content-plugins)

Click to Sync Entries available for WPForms, Gravity Forms, Ninja Forms, Avada Forms, Divi Contact Forms.
  Freeze Header along with Header Colors and odd/even rows colors
  Refer to More Features based on the Contact forms you are using
  Priority Support


We hope this article helped you to know about connecting WordPress Contact Form Entries to Google Sheet

If you liked this article, then please subscribe to our YouTube Channel for WordPress video tutorials. You can also find us on Twitter and Facebook

How to Store Contact Form 7 Data to Google Sheets – Updated 2020

How to Store Contact Form 7 Data to Google Sheets – Updated 2020

Introduction:

  • CF7 GSheetConnector is the Powerful Connector Bridge between  Contact Form 7 and Google sheets.
  • It also Supports WordPress Multisite and You can Add Multiple Forms and Connect Your Forms to the Sheets.

To Connect Google Sheet and Contact Form 7
Successfully Install Contact Form 7 and CF7 Google Sheet Connector Plugins then Activate the plugin through the ‘Plugins’ Screen in WordPress.

  • Use the Admin Panel > Contact form 7 > Google Sheet screen to Add do Integration Google Access Code.

How to Store Contact Form 7 Data to Google Sheets - Updated 2020 | WesternDeal Web Solution | One-Stop Solution Provider for WordPress | Contact Form

  • Here you will need to integrate Contact Form 7 plugin with your Google account. Simply click on the “Get Code” button to get an access code for authentication.

How to Store Contact Form 7 Data to Google Sheets - Updated 2020 | WesternDeal Web Solution | One-Stop Solution Provider for WordPress | Contact Form

  • By clicking on the get code button it will redirect you to your Gmail account. Sign in and you will get a message to allow create, edit, delete and view your google sheets.

How to Store Contact Form 7 Data to Google Sheets - Updated 2020 | WesternDeal Web Solution | One-Stop Solution Provider for WordPress | Contact Form

  • By clicking on the Allow button you will get your access code. You can copy code and enter the code in the textbox and save it. After saving the code you will see a message in green that the Access code was saved. But do check debug log for invalid access code

How to Store Contact Form 7 Data to Google Sheets - Updated 2020 | WesternDeal Web Solution | One-Stop Solution Provider for WordPress | Contact Form

  • Go to Google Drive, Create a New Google Sheet, and Add Google Sheet Title and Google Sheet Tab Name.

How to Store Contact Form 7 Data to Google Sheets - Updated 2020 | WesternDeal Web Solution | One-Stop Solution Provider for WordPress | Contact Form

  • Go to the Contact form 7 > Here click on edit of Contact form for which you want to connect with Google Sheet.

How to Store Contact Form 7 Data to Google Sheets - Updated 2020 | WesternDeal Web Solution | One-Stop Solution Provider for WordPress | Contact Form

  • Click on the Google Sheet Tab.
  • From the Respective Google Sheet copy-paste the “Google Sheet Title” and “Google Sheet Tab Name” on the Google Sheets Tab in the Contact Form 7.

How to Store Contact Form 7 Data to Google Sheets - Updated 2020 | WesternDeal Web Solution | One-Stop Solution Provider for WordPress | Contact Form

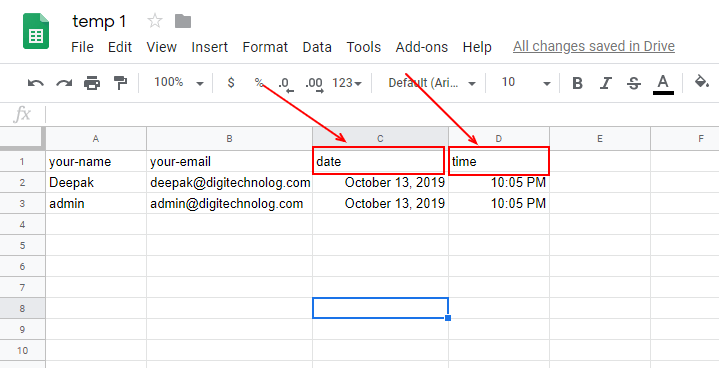
  • Go to Google Drive in the Google sheets tab, provide column names in row 1. (e.g. “your-name”, “your-email”, “your-subject”, “your-message”, etc).

How to Store Contact Form 7 Data to Google Sheets - Updated 2020 | WesternDeal Web Solution | One-Stop Solution Provider for WordPress | Contact Form

  • Test your form submit and verify that the data shows up in your Google Sheet.


How to Create Custom Ninja Forms in WordPress

How to Create Custom Ninja Forms in WordPress

Ninja Forms is easily one of the most powerful, flexible, and easy-to-use form builder plugins for WordPress. Ninja Forms is the ultimate FREE contact form creation tool for WordPress. Build forms within minutes using our simple, yet powerful, drag-and-drop form creator. For beginners, quickly and easily design complex forms with absolutely no code. For developers, utilize built-in hooks, filters, and even custom field templates to do whatever you need at any step in the form building or submission using Ninja Forms as a framework.

We’ll show you how you to install and use the Ninja Forms plugin.

Step 1: Download and install Ninja Forms.
You can either download Ninja Forms directly from the WordPress repository and upload to your website, or you can go to Plugins>Add New in your WordPress dashboard and then search for Ninja Forms there and install.

How to Create Custom Ninja Forms in Wordpress | WesternDeal Web Solution | One-Stop Solution Provider for WordPress | Contact Form

Step 2: Add your new WordPress contact form builder!
Now you’ll want to add a contact form, click Add New to open the form builder and select contact form.

How to Create Custom Ninja Forms in Wordpress | WesternDeal Web Solution | One-Stop Solution Provider for WordPress | Contact Form