CF7 GSheetConnector is the Powerful Connector Bridge between Contact Form 7 and Google sheets.
It also Supports WordPress Multisite and You can Add Multiple Forms and Connect Your Forms to the Sheets.
To Connect Google Sheet and Contact Form 7
Successfully Install Contact Form 7 and CF7 Google Sheet Connector Plugins then Activate the plugin through the ‘Plugins’ Screen in WordPress.
Use the Admin Panel > Contact form 7 > Google Sheet screen to Add do Integration Google Access Code.
Here you will need to integrate Contact Form 7 plugin with your Google account. Simply click on the “Get Code” button to get an access code for authentication.
By clicking on the get code button it will redirect you to your Gmail account. Sign in and you will get a message to allow create, edit, delete and view your google sheets.
By clicking on the Allow button you will get your access code. You can copy code and enter the code in the textbox and save it. After saving the code you will see a message in green that the Access code was saved. But do check debug log for invalid access code
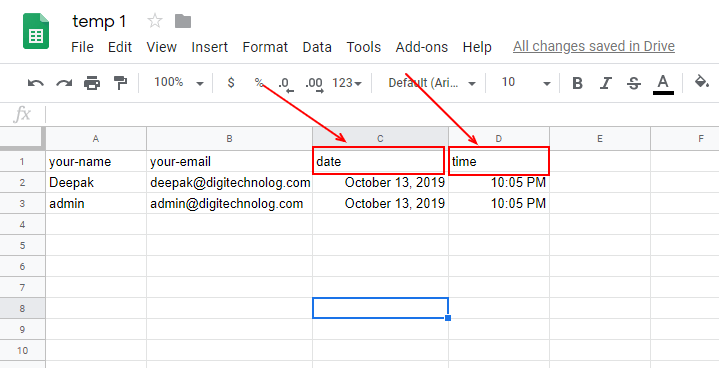
Go to Google Drive, Create a New Google Sheet, and Add Google Sheet Title and Google Sheet Tab Name.
Go to the Contact form 7 > Here click on edit of Contact form for which you want to connect with Google Sheet.
Click on the Google Sheet Tab.
From the Respective Google Sheet copy-paste the “Google Sheet Title” and “Google Sheet Tab Name” on the Google Sheets Tab in the Contact Form 7.
Go to Google Drive in the Google sheets tab, provide column names in row 1. (e.g. “your-name”, “your-email”, “your-subject”, “your-message”, etc).
Test your form submit and verify that the data shows up in your Google Sheet.
Protect your WordPress site from hackers.Keep your site locked down and secure with the fully-featured iThemes Security plugin. Follow the steps. You’ll find out how it protects your site from all kinds of security threats, from brute force login attempts to troublesome bots and vulnerabilities.
It’s true that WordPress is a reliable secure CMS right out of the box. It gets constant updates to fix any bugs and plug any security holes that emerge.
But, it’s also one of the most targeted content marketing systems by hackers because of its massive popularity.
Every site is vulnerable. Hackers target all varieties of websites, not just to steal data, but also to spread malicious code to your site’s visitors.
About iThemes Security:
iThemes Security is the best security plugin created by the WordPress security experts at iThemes. The plugin helps you secure and protect your WordPress site from all security threats and provides you with peace of mind. It’s simple and user-friendly; you can use it easily even if you’re a beginner.
The plugin works to fix common security issues and protects your site from hacks, malware, and breaches. It adds an extra layer of protection to your WordPress site so it becomes impossible for online villains to break your site.
The major features of the plugin are brute force protection, file change detection, 404 detection, strong password enforcement, and database backups. Moreover, there’re much more brilliant security features in the plugin. Above all, instant email notifications after threat detection helps you fix issues quickly.
How iThemes Security Keeps Your Site Secure
iThemes Security has over 30 ways to keep your site safe and secure from hackers, including:
Ban the IP addresses of known attackers from logging into your site
Lock out users after too many bad login attempts
Scan your site to detect malware and other suspicious code
Enforce strong passwords for all accounts
Force SSL for your dashboard or any page or post, as long as your server supports it
Monitor your files for any unauthorized changes
Receive email notifications of any suspicious activity on your site
Obscures and hides important system information about your WordPress installation
How to setup iThemes Security On Your Site
Before installing the iTheme Security Plugin take your website first .
After installing and activating the plugin, you’ll see a notification to activate iThemes Brute Force Network Protection, which is free. This connects you to the iThemes network, so known brute force attackers already in their database will be automatically blocked from logging in to your site.
Now, you can navigate to Security » Settings to choose which security options you’d like to enable.
The features with an Enable button are easy to set up: just click the button and it’s set.
The features with a Configure Settings button may require you to review settings or fill out a few options to get started.
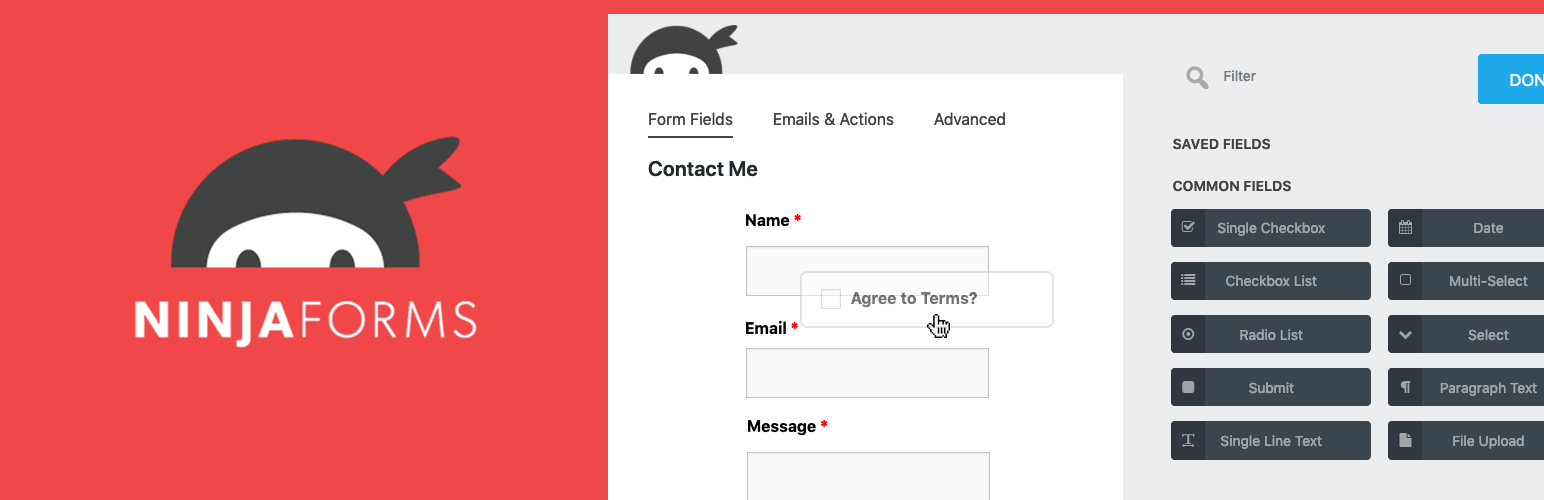
Ninja Forms is easily one of the most powerful, flexible, and easy-to-use form builder plugins for WordPress. Ninja Forms is the ultimate FREE contact form creation tool for WordPress. Build forms within minutes using our simple, yet powerful, drag-and-drop form creator. For beginners, quickly and easily design complex forms with absolutely no code. For developers, utilize built-in hooks, filters, and even custom field templates to do whatever you need at any step in the form building or submission using Ninja Forms as a framework.
We’ll show you how you to install and use the Ninja Forms plugin.
Step 1: Download and install Ninja Forms.
You can either download Ninja Forms directly from the WordPress repository and upload to your website, or you can go to Plugins>Add New in your WordPress dashboard and then search for Ninja Forms there and install.
Step 2: Add your new WordPress contact form builder!
Now you’ll want to add a contact form, click Add New to open the form builder and select contact form.
Autoptimize series all scripts and styles,minifies and compresses them,adds expires headers,and caches them.it also moves styles to the page head and scripts to the footer.
This WordPress plugin even minifies the html code itself,making your page extremely lightweight.
Follow the steps:
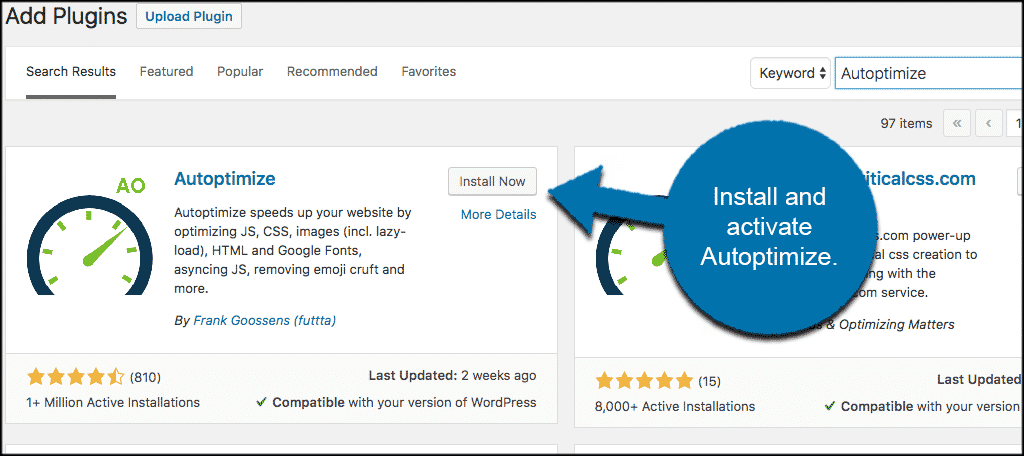
1. Log into your wordpress admin panel.
2. Hover your mouse over “plugins” and click ” Add New “.
3. In search box type ” Autoptimize ” and click ” search plugin .”
4. Click install Now. After the plugin is installed,click ” Activate Plugin .”
5. Navigate to ” settings -> Autoptimize “.
6. Click on the ” Show advanced settings ” button.
7. In the HTML section , enable ” Optimize HTML Code” and ” Keep HTML comments “.
8. In the ” Java Script options ” section, enable “Optimize Javascript code ” and ” Force javascript in head.” If your .js breaks to script error , you can try enabling ” Add try cache wrapping ” as well.
9. In the css options section, enable ” Optimize css code.”
10. Click on the ” Save changes and Empty Cache ” button.
First you’ll need to get a copy of the Slider Revolution WordPress Plugin. There are a few different methods to install the plugin depending on if you purchased your own copy of the plugin or if it was included with your premium theme.
1. Install Your Copy of Slider Revolution
If you purchased your own copy of Slider Revolution from CodeCanyon log into your Envato account and go to your downloads page (you can get to this page by hovering on your username). Then locate your copy of Slider Revolution and select the download option for “Installable WordPress file only.”
Next, log into your WordPress site and navigate to Plugins > Add New and click on the “Upload Plugin” button at the top left of your screen.
From here, use the “Choose File” button to select the plugin file you just downloaded from CodeCanyon, and click the “Install Now” button. After that just activate the plugin and you’re ready to start building sliders!
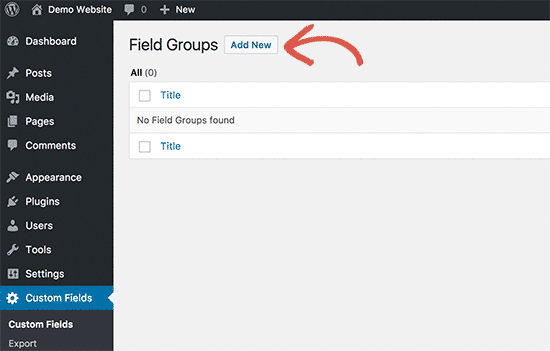
Select the wp-content on Custom Fields —> Field Groups
Click on Add New Button Then after Add New Field Group Name and Add Fields like Fields Label, Fields Name, Fields Type.
Title:-
Each Field Group Requires a Title. Title is shown in the Metabox Handle on The Edit Screen to use
Relevant Titles Such as “Home Page”.
Fields:-
Here you can create and manage a variety of custom fields. Clicking the “Add Field” button will create a new field and add it to the bottom of the list (you can reorder your fields by dragging the order number as a handle). Adding a field will look like this: